
Digging Dinosaurs!
By: Glenn W. Storrs, Ph.D., Withrow Farny Curator of Vertebrate Paleontology
In order to dig dinosaurs, you must first really dig dinosaurs. That is, like them a lot, because the physical digging/excavating/collecting of dinosaurs is not for the faint-hearted. It’s a grueling, exhausting, painful exercise in self-denial – until such time as the precious fossils are finally secured in the museum collection or exhibit hall. All of this is magnified as the exuberance of youth gives way to the general aches and pains of, shall we say, growing maturity.
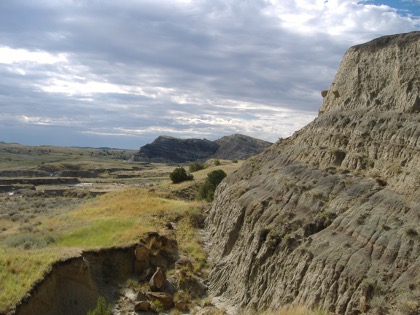
Dinosaur fossils, or at least those most amenable to collection, tend to found in remote parts of the world – often in desert regions that are sparsely inhabited by virtue of their inhospitable nature. There are a couple of reasons for this. Firstly, even though rains may be infrequent in deserts, when they do come they are a powerful force of erosion that actively brings fossils to the surface. That is, periodic downpours may uncover dinosaur and other fossils that can be found by surface prospecting. It’s important to note here that paleontologists don’t start digging randomly. They wait until there is an indication on the surface that something of interest is to be found below. In the case of dinosaurs, you need to be looking at rocks of the right geologic age, i.e. those from the Mesozoic System (the exception being if you’re looking for fossil birds – avian dinosaurs – in which case Cenozoic rocks will work, too!). Your rocks also have to be of the right environmental type. You can’t find fossils of organisms that weren’t at one time living in the region being investigated, or weren’t otherwise transported in to it, say by an ancient river, or if the original depositional conditions would not allow for their preservation.
Additionally, because deserts are dry and unwelcoming, they tend not to be covered by buildings and trees! One of the earliest dinosaur fossils found in North America, Hadrosaurus foulkii, came from New Jersey, back when marl pits were dug by hand in the mid-19th century, but little such activity takes place there today, so we go west! The U.S. Western Interior, or Rocky Mountain west, is a particularly good place to go because tectonic forces have brought vast swaths of dinosaur bearing rocks to the surface in what is now a region of active erosion.
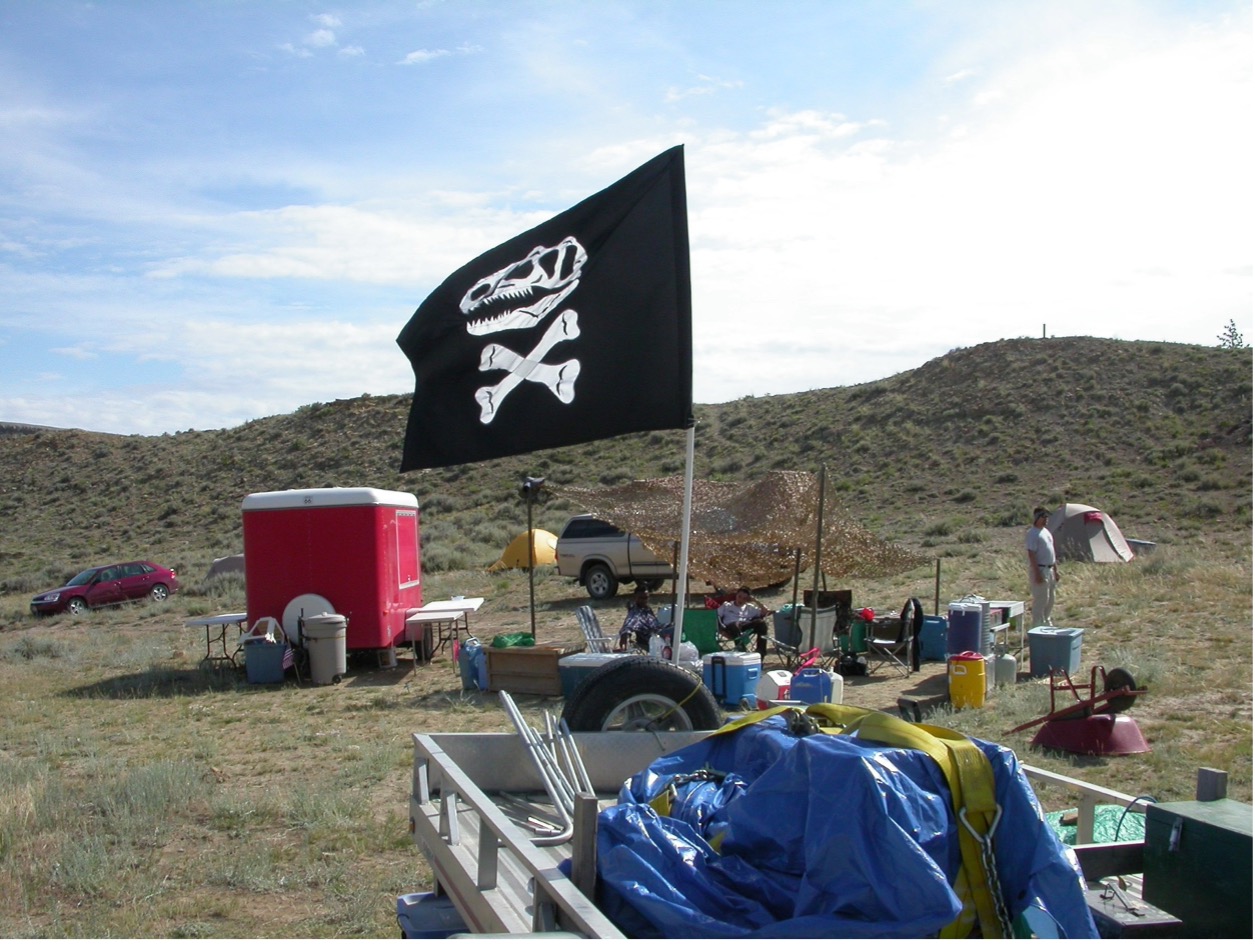
Prospecting for fossils involves lots of hiking, getting to and exploring outcrops, climbing down into and up ravines, traversing barren hillsides, clamoring over rocks, avoiding rattlesnakes and often in very hot, dry, dusty conditions. While exploring the proper rocks, bits of dinosaur bone may not be uncommon. The trick is to find the spot from which these fragments are weathering. If this can be done, by tracing the bits back up a hillside, for example, they may lead to part of or even most of a bone. If one is lucky, more than one bone may be present, but it’s a good field season indeed that produces much of a skeleton.
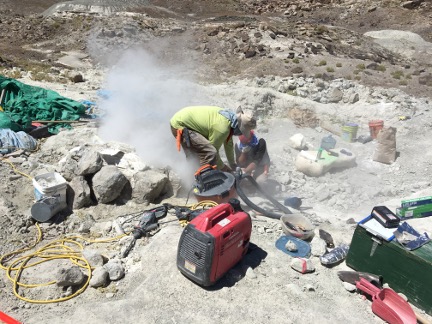
If a bone, several bones or even part of a skeleton is found, the thrill of discovery can soon give way to the tedium of excavation. That’s perhaps not quite right, because as one exposes a bone to the surface by carefully removing the enclosing rock matrix, there is excitement in the realization that no living thing will have seen that fossil for millions of years! No, the tedium or frustration may come from the removal of tons of overburden – that rock, often feet or tens of feet thick – that lies above the fossil horizon and which must be removed before any careful excavation of bones can begin. This overburden removal is often accomplished by the use of hand tools – picks, shovels, perhaps a portable jack-hammer and the like. It may be impractical to get power equipment like a backhoe into a site, either because the land is too rugged, or far removed from a serviceable road, or in the case of public lands, may be protected from off-road access and disturbance by heavy equipment. Digging through rock, which by the way, gets more solid and harder as you dig deeper, with picks and shovels can quickly lead to sore muscles, aching backs, blisters and in my case, exhaustion. Not as young as I used to be! Rock saws, drills and air tools can be welcome additions to one’s arsenal in these cases, but you still need to carry them in to the fossil quarry.
This may be a good place to note that collecting vertebrate fossils, such as dinosaurs, from public lands in the US requires a government permit. The agency involved may be the Bureau of Land Management, the National Park Service, the US Forest Service or another federal entity in the case of federal lands. State lands and local government parcels often have their own regulations. A permit allows the management agency to track the research that is done on land under its jurisdiction, but more importantly, protects such rare and non-renewable fossil resources for the American people. A museum does not own the fossils collected under permit, but rather cares for them on behalf of the people and its government. Only a museum or other designated repository, such as a university, can be approved for a permit, and only by demonstrating that it has the facilities and expertise needed for fossil collection and care. Of course, private landowners must give their permission for anything done or collected on their land, too, and foreign governments will have their own requirements. The days of scientific colonialism are long over.
Actual collection of a bone/skeleton will require many hours of work more after the overburden is removed. Here, subtler tools are used, often to include hammers, chisels, awls, dental tools and brushes. The matrix is carefully dug way from the top of the fossil, but only to the extent that the general geometry of the fossil can be ascertained. Preparation – cleaning and conservation of the fossil – must be reserved for the laboratory where better conditions allow for greater care – no dust storms, blazing sun, parched throats, rain or hail, flash floods, lightning, biting insects nor scorpions under rocks need interfere. Too much matrix removal in the field can expose a specimen to unnecessary damage, so a certain amount of speed is ideally combined with great care to get the fossil out of the ground. As in any endeavor, experience comes in very handy.
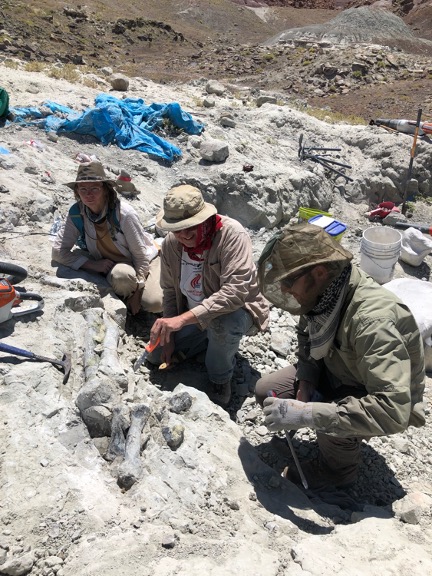
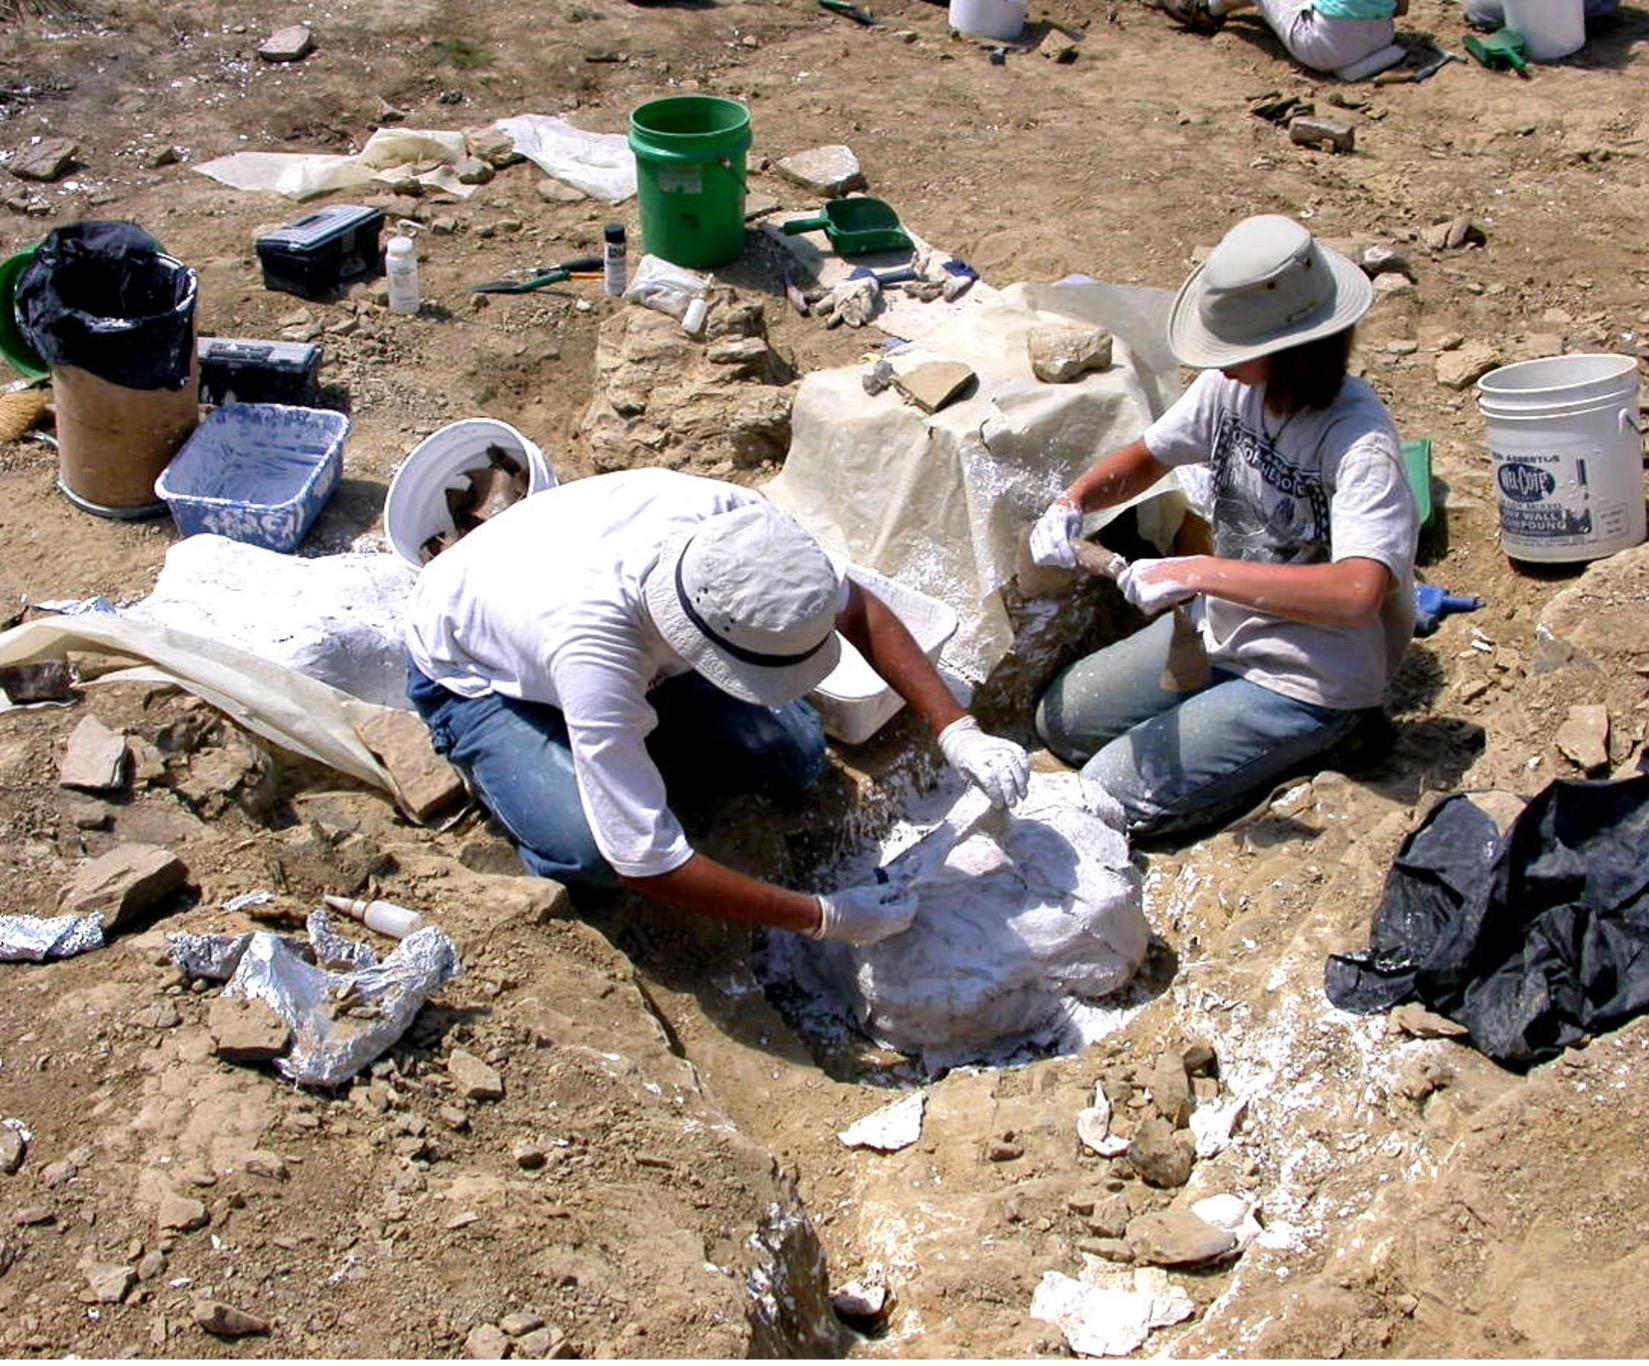
Removal of rock on top of the fossil is just part of the process. Once the extent of the specimen is known, a trench is dug around it resulting in a bone (or bones) positioned on top of a pedestal of rock. This act of “pedestaling” allows the excavator to dig under the bone for ultimate removal of a block of rock containing the fossil. First, however, the bone itself must be protected in place. This is typically achieved by the application, initially, of an archival quality consolidant (“glue”) to penetrate and strengthen the fossil and hold any loose bits in place. In the old days, various varnishes or shellacs might be used (hardly archival!), but today a number of chemical resins such as Butvar, Vinac or Paraloid that are soluable in acetone or alcohol are commonly used, depending upon the circumstance. I’m partial to Butvar (polyvinyl butyral) - largely because there was already a 55 gallon drum of powdered resin at the museum when I was hired 25 years ago! We’ve only recently had to order a new one! Various “superglues” or even white glues (think Elmer’s) may also be used in some situations.
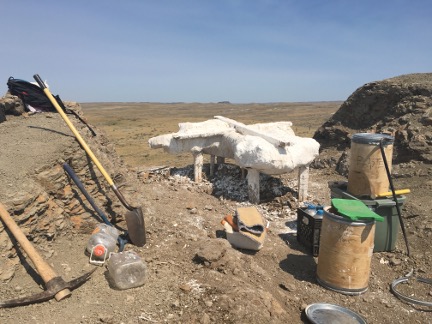
After the consolidant has dried on the fossil the block will be “jacketed” in plaster of Paris, much as a doctor may put a cast on a broken arm. Strips of burlap soaked in wet plaster will be laid upon, around and under the block in as many layers as appropriate. The dried plaster will provide a protective barrier against damage and hold the block and fossil(s) together when removed from the ground for transportation. An important intermediate step should be noted here. In order for the field jacket to be readily removed from the block later in the lab, a physical separator must be applied to the bones before the plaster strips. We typically use “the paleontologist’s friend” – toilet paper – useful for many things around camp! Damp wads of paper are placed on the bones until fully and thickly covered so that the plaster strips can be easily cut off. Some collectors will use sheets of aluminum foil or paper towels for the same purpose, but I like the ease of application of TP and the thicker separation barrier that results. Experiments with jacketing materials other than plaster have been tried, such as two-part expanding urethane foam, but while this provides a lighter jacket, the foam will break down in the collection if not dealt with in a timely way. It’s also not as strong in most cases. For really big jackets, multiple layers of plaster will require internal supports such as tree limbs, lumber, rebar or pipes. I’ve used them all over the years.
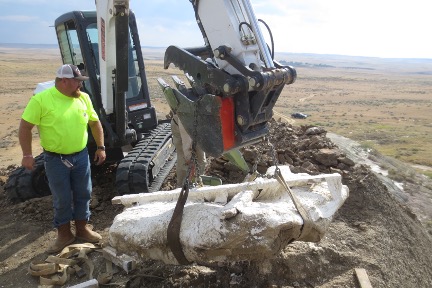
Removal of the resulting field jacket requires that the rock/bone block is fully encased in plaster. This may be done, in the case of relatively small blocks, by undercutting the fossil pedestal to the point where it may be flipped over by hand, taking care not to let anything but loose rock fall out from underneath. The underside may then be plastered as before (here’s where plaster-covered volunteers always tell the I’m “plastered” joke – it never gets old). Big blocks will need to be tunneled underneath and supported by pillars of rock and or lumber while plaster strips are held in place to dry. I find that this is a good job for graduate students. Occasionally, a crate may need to be built around a block while still in place. Small blocks can be lifted/carried by hand. Big ones will need mechanical assistance such as the clever use of levers, pulleys, winches, wheels or sleds, but if you can get a tractor or helicopter, all the better! A block containing part of one of our exhibit dinosaurs ultimately weighed in at 1.5 tons!
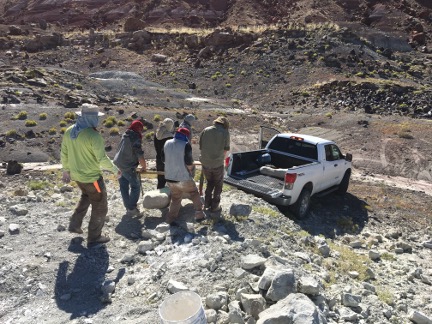
Once on the truck or trailer the hard work is usually done and it’s just a matter of safely getting back to a smooth road and the specimen(s) ultimately to the lab. I’ve had my share of flat tires in this regard, however, so it’s not always as easy as it sounds. Nevertheless, a good day’s/week’s/month’s work is cause to celebrate and relax. Now the process of preparation in the lab begins, followed by curation and/or exhibition. This normally takes far longer than, and at least as much care as, the process of collecting the fossils in the first place. However, that’s a topic for another day! If this all sounds like fun to you, you might be cracked up to be a field paleontologist. You can go the route of study and degreed “certification” to lead projects yourself, or if you just want a taste, your local museum may have volunteer opportunities that you can undertake. In any case, happy hunting!

